
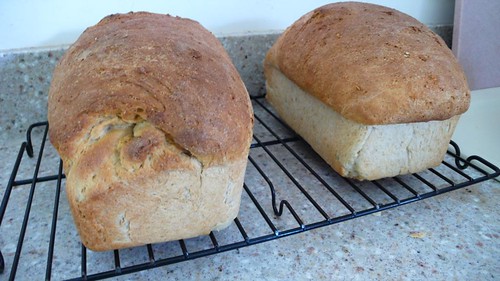
Here is the recipe for the Honey Whole Wheat bread that I make several times a week. It's great plain fresh out of the oven, in a savory sandwich, as toast with butter, french toast, or whatever else you want to do with it. The bread is flavorful with honey and butter, but not so overtly that you can't use it in a good, hearty, BLT.
This is my version of my mom's original recipe. I am completely happy with this recipe, but feel free to vary it according to your own taste, adjusting the balance of whole wheat to white flour, etc.
Note: These directions assume that you are making this recipe by hand. If, instead, you are using a substantial stand mixer (like a Kitchen Aid) or a bread machine, add the liquid first, then the dry, and break the egg on top of it all. If you're using the bread machine, you will want to add both cups of whole wheat flour right away -- just check on it after it's been kneading for a little while to see if it needs more flour or a few more tablespoons of water.
Combine in large bowl:
1 cup whole wheat flour (you will need one more cup after liquid ingredients have been added)
1-1/2 cups white bread flour (very important that it's bread flour and not all purpose)
1/3 cup rolled oats (I use Old Fashioned Rolled Oats)
1 tsp salt
1 scant Tablespoon yeast
1 heaping Tablespoon Vital Wheat Gluten
Melt:
1/4 cup (1/2 stick) butter
Add:
1/4 cup honey
1 cup water
Warm in microwave or stovetop to 110-120 degrees (it's almost too hot for my finger to stay in it for more than 2 or 3 seconds when it's this temp.)
Time and clean-up saving tip: melt the butter in a 2-cup glass measuring cup, add honey until it reaches the 1/2 cup mark, then add water to the 1-1/2 cup mark. Put all in microwave together -- in mine it takes 50 seconds to get to the right tempurature, and in my parent's microwave it takes just over a minute.
Add wet ingredients to dry, along with:
1 egg
Stir with wooden spoon until combined.
Add:
1 cup whole wheat flour
Tip out onto lightly floured surface, and knead for 5-8 minutes to build up gluten in flour, adding more flour as needed to keep it from sticking. Knead until smooth and elastic. (There are videos on YouTube that show you how to properly knead bread if you've never done it.)
Grease bowl and place ball of dough inside (I spray PAM on the the inside of the bowl, put the dough in, then spray the top of the dough to keep it from sticking). Put a piece of waxed paper over the bowl, then a kitchen towel to insulate.
Allow dough to rise until doubled (this may take anywhere from 1 to 2 hours depending on your house, your yeast, the weather outside, and many other factors I have yet to determine). You will know that it's ready when it looks like twice the original amount, and when you stick your fingers in the top about two inches down, the indentation stays and doesn't spring straight back up.
If you are having extra trouble getting your dough to rise, or are in a rush, turn on your oven to the very lowest setting. Place some boiling water in an oven proof bowl or pan in the bottom of the oven, and put your bowl of dough on one of the oven racks. Turn off oven when it gets fairly warm, and your dough should rise nicely. (Thanks to MA for that great tip!)
Pull dough out of bowl, and roll up into loaf shape, pulling a "skin" of dough around the whole thing to smooth it over. Place in greased loaf pan. Cover once again with waxed paper and kitchen towel, and leave to rise until doubled (this, once again, will vary in time, but expect at least an hour unless you have an especially "yeasty" house.)
Once the loaf is risen to your liking, put into a cold oven, and turn the heat on to 350 (you could pre-heat the oven, but putting it in cold gives it the extra punch to rise just a bit more). Bake until suitably golden on top -- in my oven this takes 35, and at my parent's house this took just under 30 minutes. An instant-read thermometer stuck into the loaf will read 200 when the bread is completely baked through.
Note: if you badly jar the loaf when putting it into the oven, it could deflate. If this happens, you will need to re-form the loaf and let it rise again in a re-greased pan.
Turn out immediately on to a cooling rack. This bread slices best when it's completely cooled, but seriously. Who wants to wait?
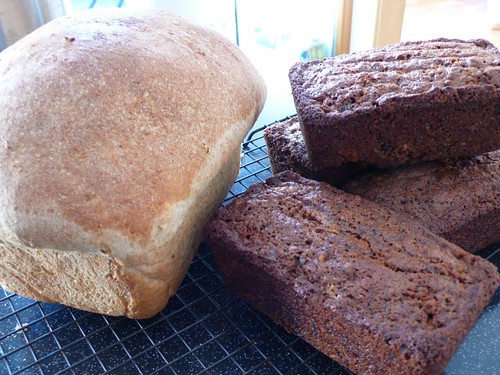
(Pictured here with mini-loaves of date-nut bread)
Blogged with the Flock Browser
4 comments:
I've been thinking about this recipe; I remember you posted it years ago. I'm pregnant again and all things bready sound really good right now!
Makes me hungry....
~Eve
Mmm that looks good Faith.
THANKS for sharing the recipe! Gonna try it.
Post a Comment